Signing in
Every company works at its own address, for example your-company.bus-system.mangosoft.mk. Open that address, add /login, and sign in with the administrator account we created for you. Agencies sign in at the same address with the login you give them.
After signing in you land on the dashboard. The menu on the left is the whole console: the stop that is lit is the page you are on.
Set up in the right order
Each step uses what the step before it created, so this order saves going back and forth:
- Destinations: the countries, cities and stations you serve.
- Currency Settings: your base currency and any others you sell in.
- Tickets: the passenger types you price, such as Adult, Children and Infant.
- Bus Garage: your coaches, their seat count and seat layout.
- Routes: the stops, times and operating days of each line.
- Pricing: the fare for every stop pair and ticket type.
Once a route has prices, its departures are on sale on your booking website.
Destinations and stations
Open Destinations in the menu. Add a country first, then its cities, then the stations in each city where passengers board or leave the coach.
- Go to Destinations → Countries and choose Add Country.
- Go to Cities, choose Add City and pick the country it belongs to.
- Go to Stations, choose Add Station, give it a clear name such as Skopje Transport Centre and pick its city.
Passengers search by city name, and see the station name on their ticket. Switch a station to inactive instead of deleting it when you stop serving it for a while.
Coaches and seat classes
In Bus Garage → Buses, choose Add Bus and enter the model, production year, registration plate and number of seats, plus the rows and columns of its seat layout. A route that uses the coach takes its seat count from here.
Bus Garage → Seat Classes lets you name seat categories, give each a colour on the seat map, and add or subtract a price for seats in that class.
Ticket types and currencies
Tickets holds your passenger types. Each type gets its own fare on every route. Turn off occupies seat for infants who travel on a lap, so they don’t reduce the seats left on the coach.
Currency Settings holds one base currency and any others you sell in. Give each extra currency its exchange value against the base, so the dashboard can add up revenue from every route correctly.
Routes and schedules
A route is a line you run regularly. You describe it once, and MangoBus creates one departure for every date it operates.
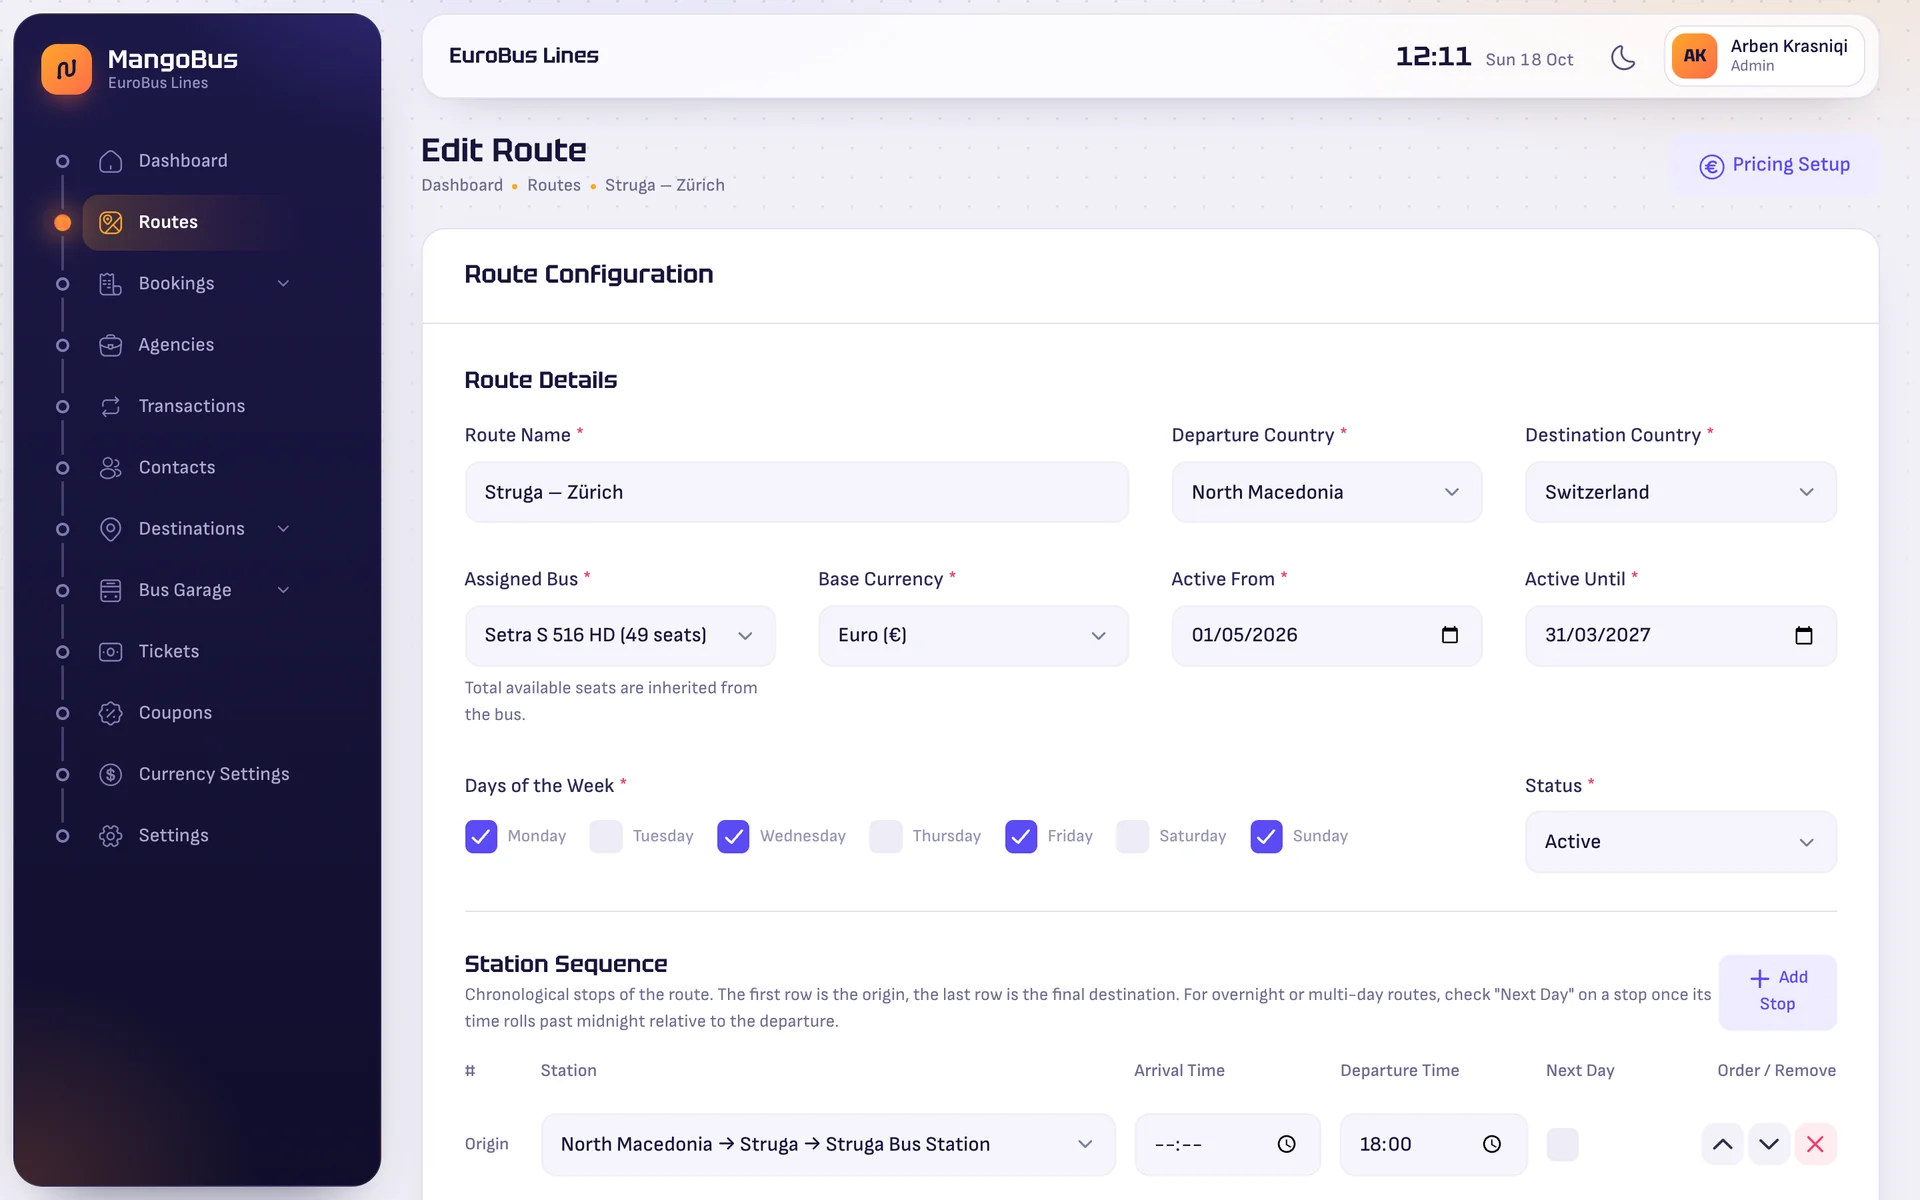
- Go to Routes and choose Add Route.
- Enter the route name, departure and destination countries, the coach and the currency of its fares.
- Set Active From and Active Until, tick the Days of the Week it runs, and set the status to Active.
- Under Station Sequence, add the stops in travel order with Add Stop. The first row is the origin, the last row the final destination.
- Enter the arrival and departure time of each stop, then choose Save Route.
Pricing
Open a route’s pricing with the euro icon in the route list, or Pricing Setup on the route page. The matrix has one row for every pair of stops on the route and one column pair for every ticket type.
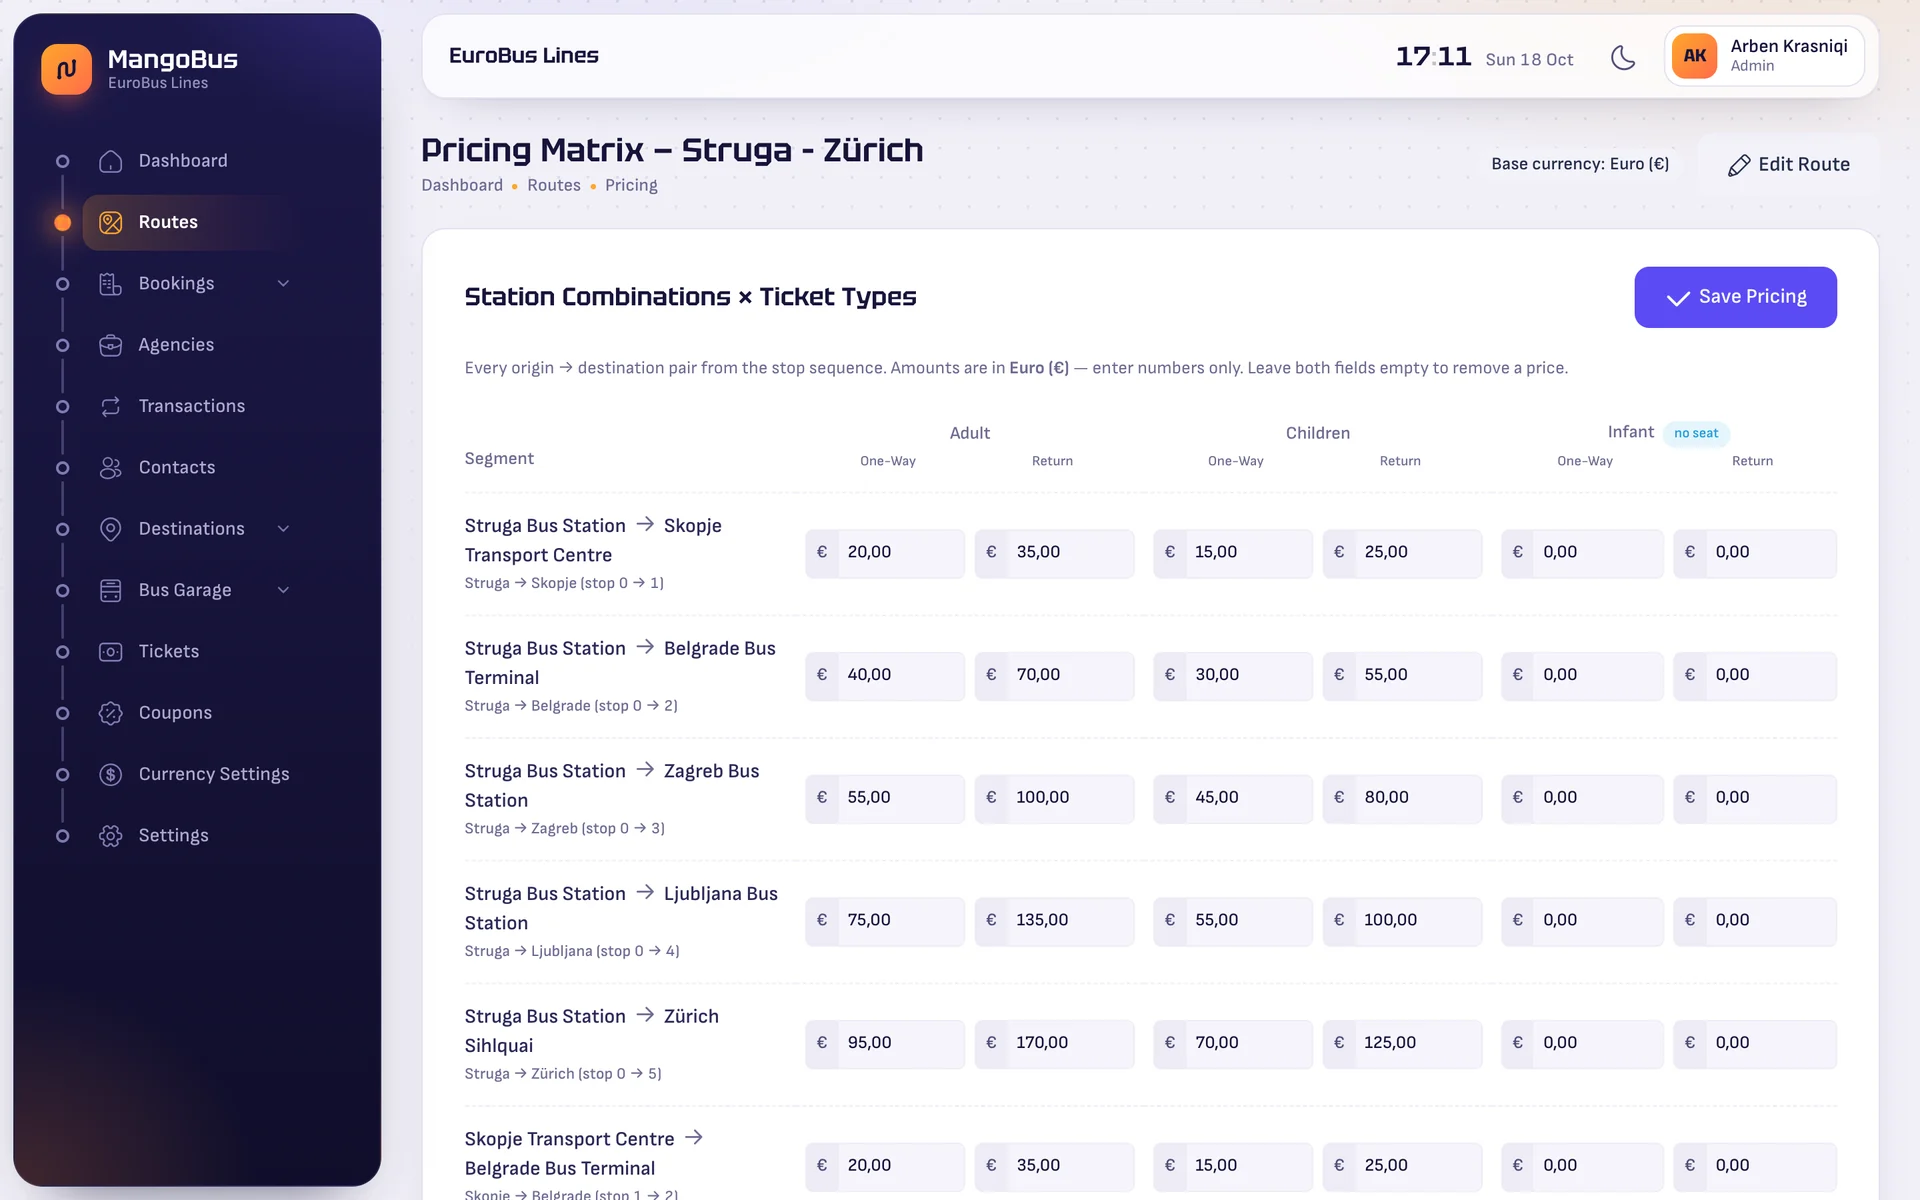
Enter numbers only, in the route’s currency, and choose Save Pricing. Leave both fields of a cell empty to stop selling that combination. A return trip is charged the return fare of the route that brings the passenger back.
Departures and single dates
The departures icon in the route list opens every dated departure of that route, with seats sold and available, bookings and notes. Filter by dates or status to find a day quickly.
Choose the pencil next to a date to change that one departure. Everything you set here applies to that date only; every other departure keeps the route’s normal plan.
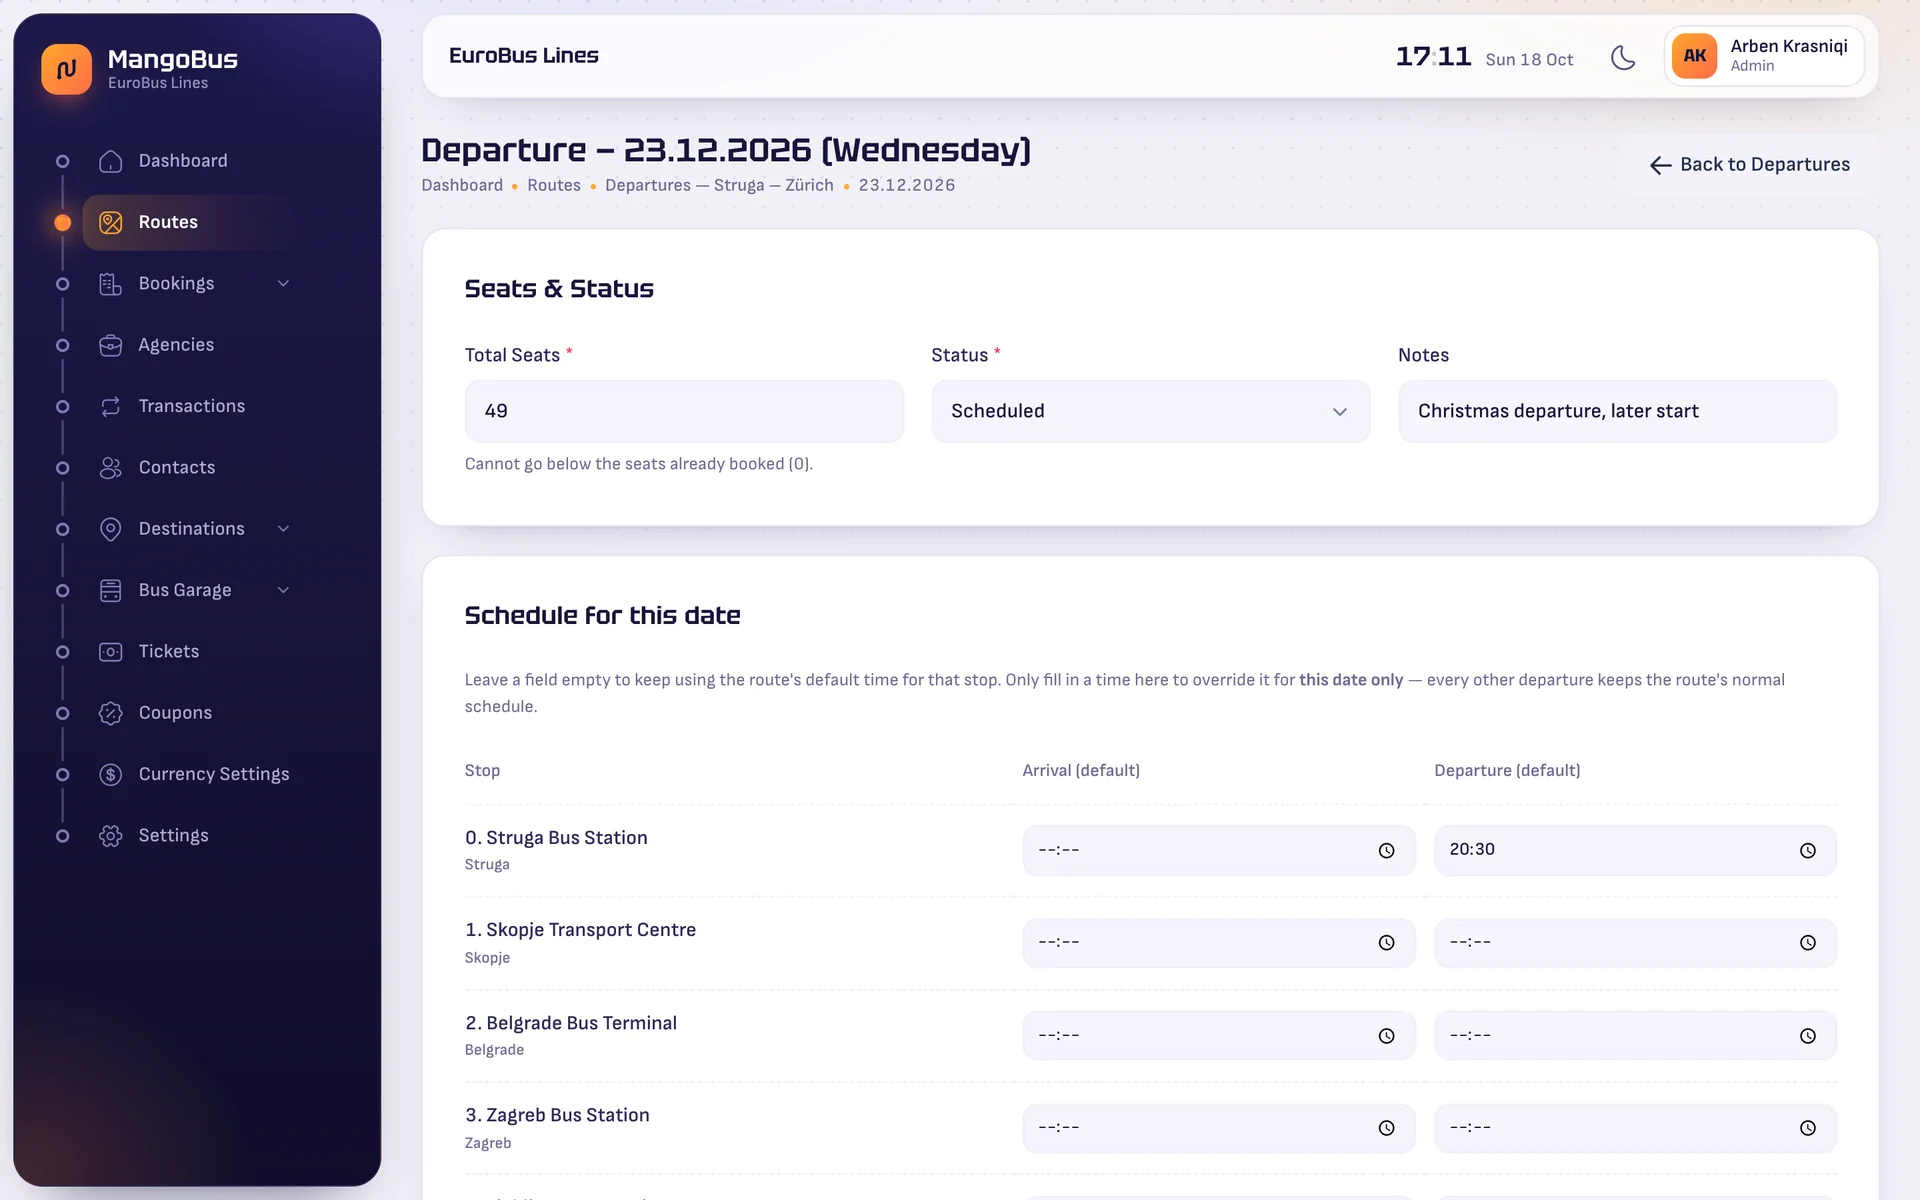
- Seats and status: add seats for a bigger coach, or cancel the departure. Seats can’t go below what is already booked.
- Schedule for this date: type a different time at any stop. Leave a field empty to keep the normal time.
- Prices for this date: set a different fare, for example for a holiday. Empty fields keep the route price.
A departure can only be deleted while nobody is booked on it. Cancel it instead when it already has bookings.
Days off
Use the calendar icon in the route list, then Add Day Off, to stop a route on a particular date, for example a public holiday. That date’s departure is removed, or cancelled if it already has bookings. Remove the day off and the departure runs again.
Bookings
Everything about reservations lives under Bookings.
- Unconfirmed Reservations: online bookings wait here until their payment is verified. Check the payment, then confirm the booking; MangoBus records the payment as a transaction.
- Confirmed Reservations: every paid booking. Filter by route, ticket number, passenger or travel dates.
- Route Roster: passenger lists per departure, described below.
- Archive: older bookings, kept searchable.
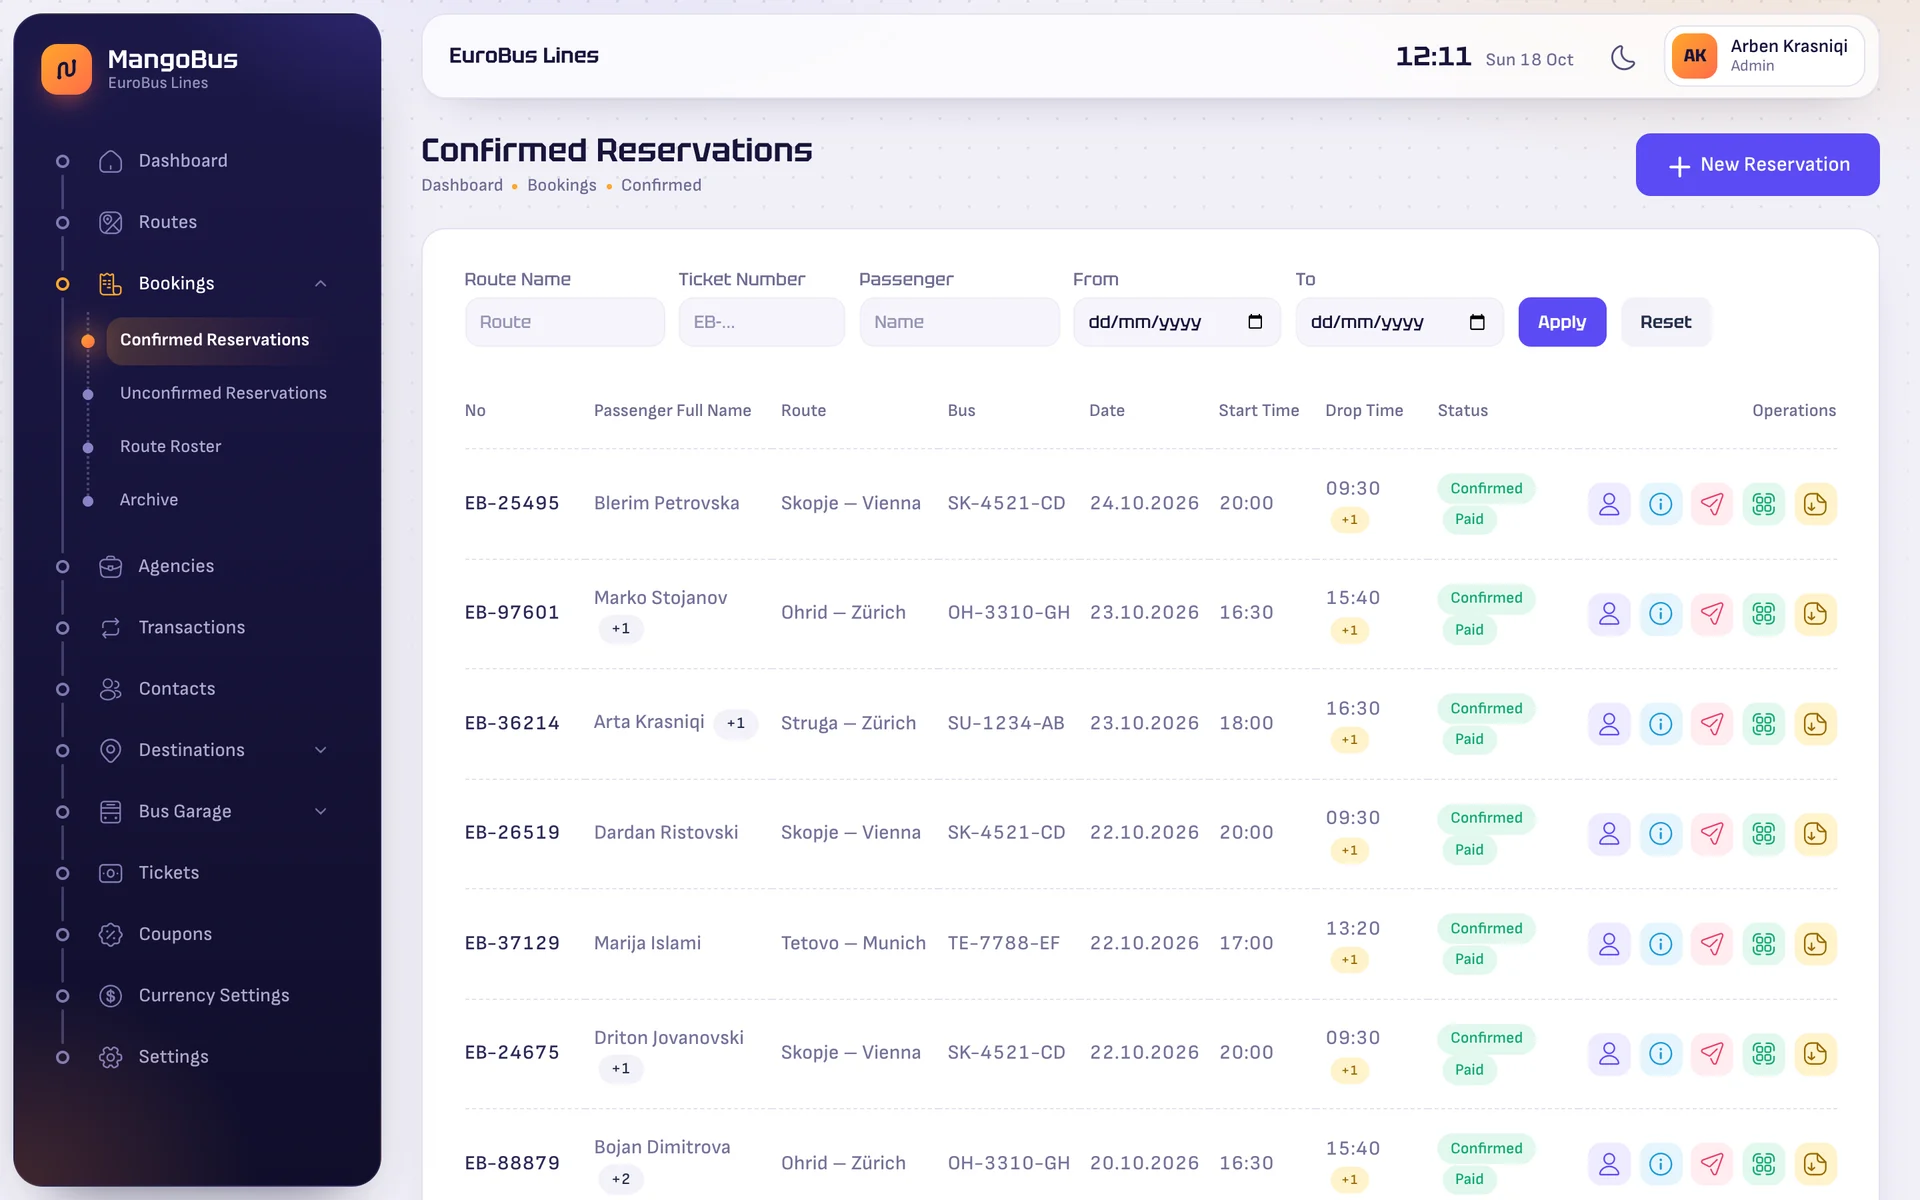
To book for someone at the office or on the phone, choose New Reservation. Pick the route and travel date, the boarding and drop stations, the passengers and their ticket types, then the payment status and method, and choose Create Reservation. Seats are assigned automatically.
Tickets and boarding cards
Each confirmed booking has five actions, from left to right: the passenger list, the payment details, resend the e-ticket by email, the printable boarding card with QR and barcode, and the PDF ticket download. Passengers can download their own ticket from their account once the booking is confirmed.
Passenger lists
Open Bookings → Route Roster, choose the route and the travel date, and select Load Manifest. You get every passenger on that departure with their ticket type and seat, ready to hand to the driver.
Agencies
Partner agencies sell your seats from their own panel. Agencies are part of the Business and Premium plans.
- Go to Agencies and choose Add Agency. Enter the company details and the email and password they will sign in with.
- Open the agency and set its commission under Commission Management.
- Use Adjust Balance to record a deposit or a correction. Every change is kept in the balance history.
- Use Create Invoice to bill a period, with a due date. Mark the invoice paid, or cancel it, when it is settled.
In their own panel, agencies see a dashboard, Book Ticket, My Bookings (where they can cancel), their transactions and their invoices. Their bookings appear in your lists like any other.
The booking website
Your passengers book on your company’s own website. They search by departure city, destination and date, choose one-way or return, pick ticket types and enter each passenger’s name. Seats are assigned automatically.
- Payment: by card on the bank’s secure 3-D Secure page, or reserved now and paid at your office. Card payments need your own bank merchant account, which we connect for you.
- Confirmation: the booking is confirmed once the payment is verified, and the e-ticket can then be downloaded.
- Accounts: passengers can update their details and password and see all their bookings.
- Languages: English, Albanian, German and Macedonian.
Dashboard
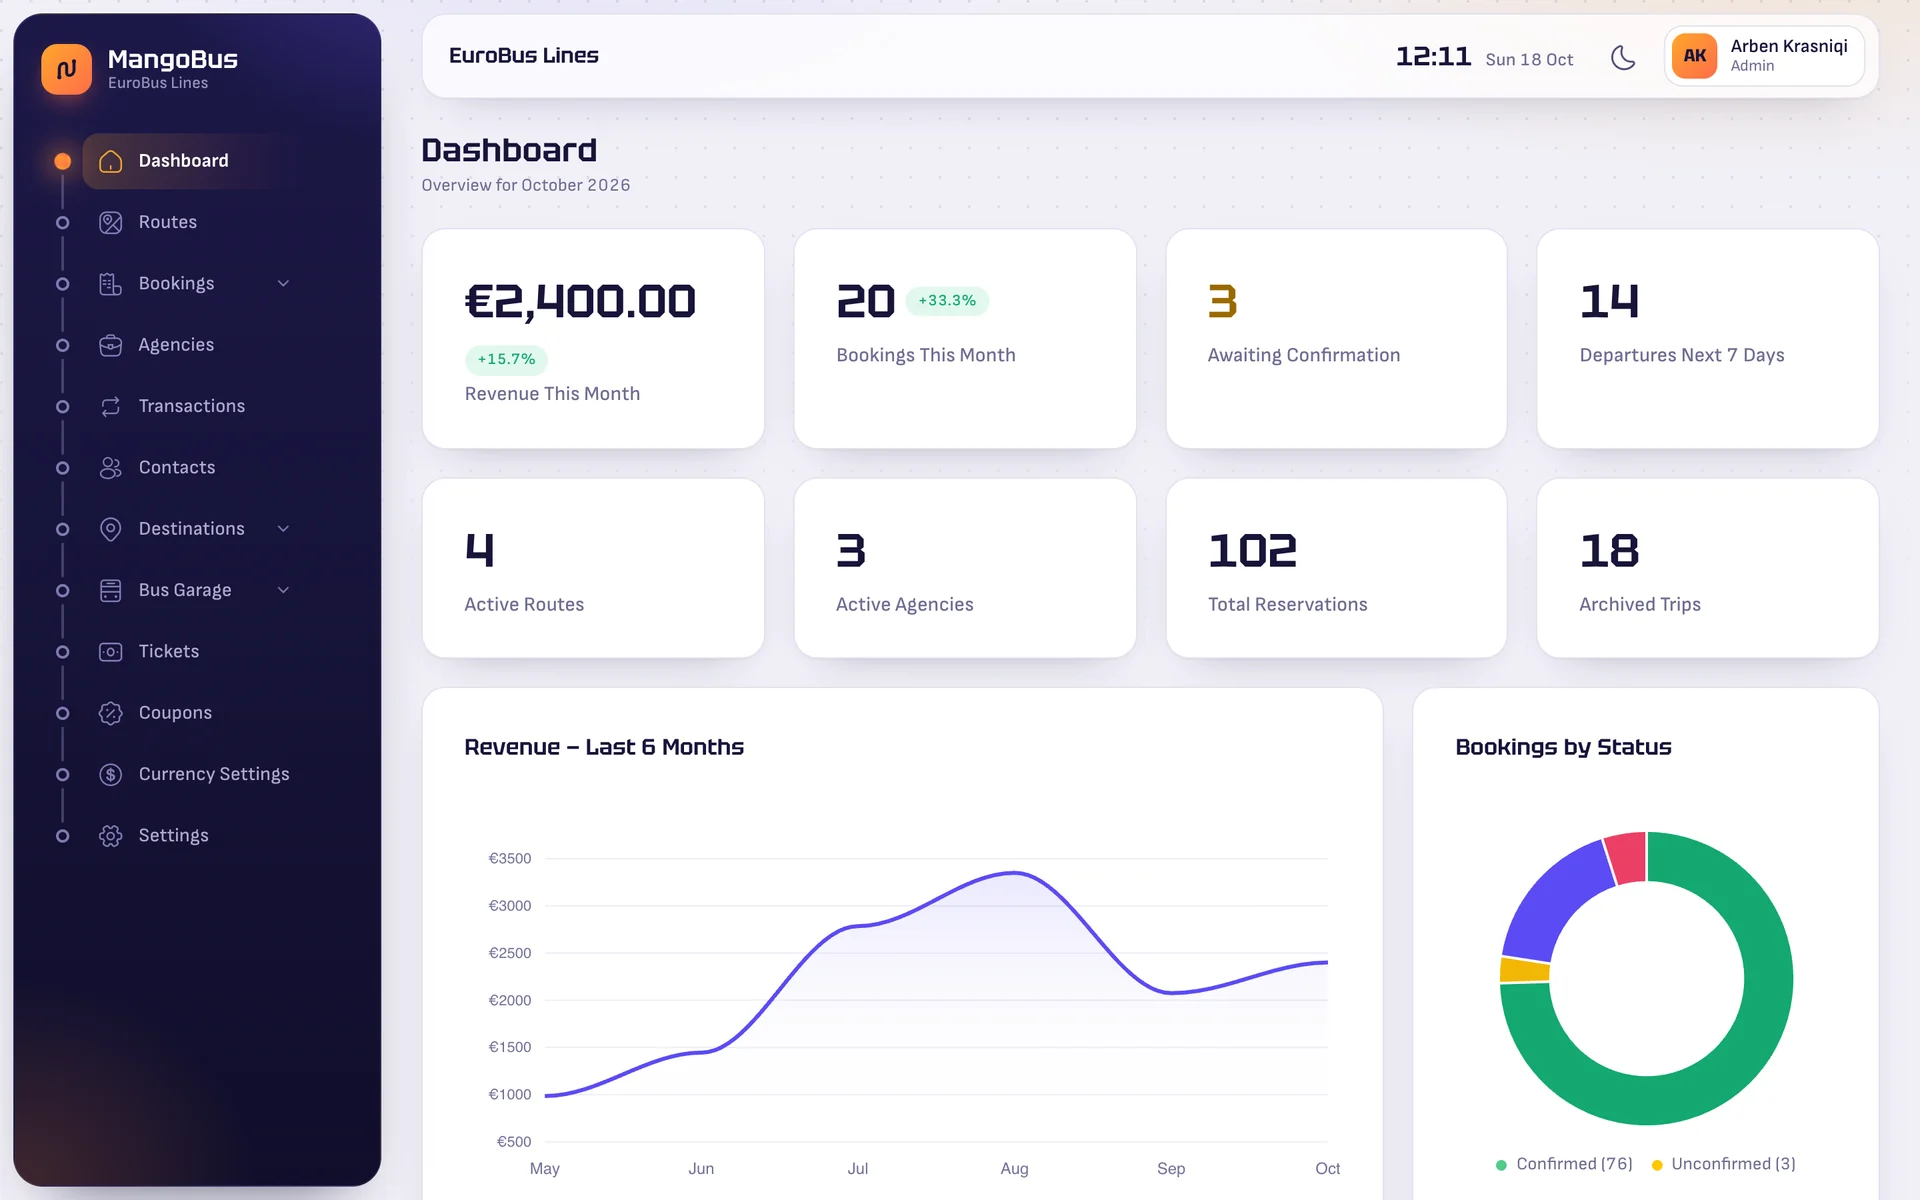
The dashboard shows revenue and bookings for the month with the change against last month, how many bookings are waiting for confirmation, the departures in the next 7 days, your active routes and agencies, a six-month revenue chart and bookings by status. Revenue is shown in your base currency.
Transactions
Transactions lists every payment received and every refund, with its reference, the booking it belongs to, the amount and its status. Open a transaction to see its full details.
Contacts
Contacts keeps customers and business partners in one place. Add them one by one with Add Contact, or choose Import to load an Excel or CSV file. You can export the list as Excel or CSV at any time.
Discount codes
Under Coupons, choose Add Coupon to create a code with a fixed amount or a percentage, an optional route it is limited to, and how many times it may be used. The list shows how often each code has been used.
Your account
Open Settings, or Account settings from your name at the top right, to change your name, email, phone and address, or to set a new password.
For platform owners
The platform owner signs in at the main address and manages companies rather than routes.
- Companies: create a company with its address and first administrator, edit it, or suspend it.
- Applications: requests sent from the Become a tenant form, with their status.
- Open admin: work inside a company’s admin panel to help them. The switcher at the top shows which company you are in, and Leave returns you to the platform.
Getting help
Read the frequently asked questions or the illustrated tutorials. For anything else, email hello@mangobus.com and tell us your company address and what you were trying to do.